
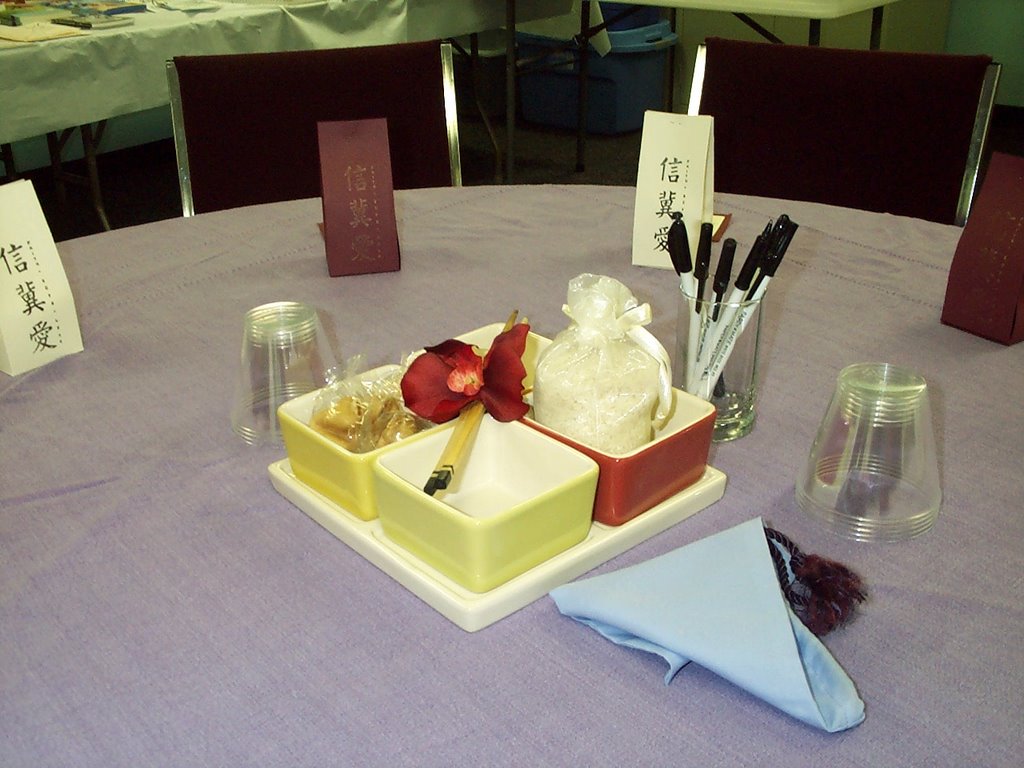
Do you like our oriental theme? The centerpieces are a set of four square dip dishes on a square platter (from IKEA) containing a rice-filled organza bag, fortune cookies and a pair of chopsticks tied with ribbon & a silk flower. Then each lady took home a treat box filled with two fortune cookies that we had specially printed for us. These are the 2-4-6-8 boxes (actually they’re 2 5/8, 5 ¼, 7 7/8 and 10 ½ boxes, but 2-4-6-8 is so much easier to say) I mentioned previously.
How to make these boxes: because we wanted taller bags, we had to use a full 8 ½ x 11 sheet of cardstock. Normally 2-4-6-8 boxes are made with a half sheet of 8 ½ x 11 (ie. 8 ½ x 5 ½), which you cut and score at 2", 4" , 6" & 8" - hence the name. You can easily find directions for those boxes on various paper crafting websites (Splitcoast Stampers is one of my favorites). The instructions here are modified for full-sheet size (and I’ve added a few hints from my experience).
Modified 2-4-6-8 boxes
1 sheet 8 ½ x 11” cardstock
stamp or other decoration (ours was a Stampendous stamp that had the words Faith, Hope and Love vertically oriented in both Chinese characters and in English – Hobby Lobby once carried this stamp, don’t know if they still do)
ink
strong adhesive – Tombow scrapbook adhesive works well
two custom fortune cookies (check out www.fortunecookiestore.com)
Start by scoring your cardstock 2 5/8” from one side, from top to bottom (see illustration below).
Next, turn the cardstock lengthwise with the score line closer to the bottom. Score down to your previous score line at 2 5/8”, 5 ¼”, 7 7/8” and 10 ½”. Then, without turning the paper, cut up from the bottom to the first score line at each of those same measurements according to the drawing. (It’s easiest if you have a blade cutter where you can run a cutting blade and a scoring blade from either end at the same time. If not, you can do all your scoring lines first, then go back and cut.) You will end up with a small ½” x 2 5/8” rectangle cut-out in one corner - just pitch it.
Here’s what it should look like (dotted lines are “score” & solid are “cut”):

Now stamp and decorate your box. You may want to lightly fold it to line up your images. We stamped our boxes on both the front and the back (remember, the side portions will fold in like on a milk carton, so you don’t want to stamp on them).
You’re ready to assemble the box. Start by folding the score lines. I recommend using a bone folder or ruler to make your folds sharper. Put adhesive on three of your four base flaps (remember which one will be the bottom as you assemble) and on the ½” flap. Put the box together, being careful to line each portion up . You’ll want to take extra care in adhering the bottom part of the ½” flap as that part tends to buckle and unglue.
Put your fortune cookies into the box. Pull the front and back together at the top, tucking the sides in like a milk carton. Then to close you can either staple the top, like we did, or you can punch holes at the top and put ribbon through to tie closed.
Here's a finished box:

Other options: cut a hole in the front section for a window. Then either cover with acetate to keep the treats in, or put the treats in a clear bag before putting into the box. You could obviously use any theme or color scheme and can change what you put into the box to match. I’ve seen Valentine boxes with Hershey kisses and Halloween ones with candy corns. Be creative! And have fun!
Oh, and since we’re price-sensitive with our “pampering”, let me give you a rough cost. Cardstock will cost you 35 cents or less per sheet. Fortune cookies run 40 cents or less apiece (depending on quantity). Plus you’ll need to add the cost of a stamp, ink and adhesive, maybe staples. At most you’ll be spending $1.50 apiece. Ours, because we were making 100 and used some coupons at the craft stores, cost less than a dollar. Change what you put in your boxes and you could probably spend even less than that.
For more ideas like this and other information on creating inexpensive gifts and decorations, check out the new book, Pampering Gifts: Crafting a Ministry of Treating People Well For Less.


1 musings:
So -THAT'S- where my allotment of creativity went :) Glad to see it's being put to good use! No, seriously, everything you've posted is just adorable - keep it up!
Post a Comment