Showing posts with label instructions. Show all posts

Friday, April 13, 2007

French Memo Board for 18" (American Girl) Doll Cabinet


I created this french memo board to go in the doll cabinet my husband made. If you want a larger board, simply scale up to whatever size you want (you may want more ribbon intersections, in which case the measurements for the ribbon placement will change drastically). Here you go:

Doll-Size French Memo Board
1/4" thick foam core board cut to 10" x 15"
18" medium weight picture wire
batting cut to 14" x 19"
fabric cut to 15" x 20"
approx. 3 yds. of 1/2" wide grosgrain ribbon
5 buttons either 1/2" or 5/8"
heavy duty thread
four small squares of cardboard

Make two holes in board 2 1/2" from top and 2" from sides (I punched with an awl). Then thread picture wire through holes. Secure ends by looping back through each other and twisting tight. The twisted side will be the front (covered) side of the board.

Lay fabric face down on table. Place batting on top, then foam board with wrapped wire end toward batting. Trim a small square out of each corner of the batting to help ease the fullness. Next pull both layers around onto back of board, making sure front side is smooth. Pull taught, pleating down fullness at corners. Staple to hold in place, making sure to staple only through fabric. If you go through the batting the staples will pop back out.

Glue around entire edge of fabric.

Mark centers of all four edges with pins.

Cut two 23" lengths of ribbon. Then cut four 13" lengths of ribbon. Pin the 23" pieces from corner to corner across both diagonals, crossing in center of board and lapping ends to back of board.

Next pin each 13" length from the center of one side to the center of an adjacent side. Repeat all the way around.

Sew five buttons onto the center of each ribbon intersection as follows: mark a starting point on the back of the board by poking need through front center mark of ribbon "x". To keep thread from pulling through foam, anchor by sewing through a cardboard square. With thread doubled and knotted, pull through cardboard, then through previously made hole in board. Sew through button and back down through foam board and cardboard. You can repeat if desired. Then knot.

Finish off board by gluing loose ends of ribbon to back of board. Then hang.

Note: we put two 1/2" small screw eyes (opened with pliers) on the door of the cabinet and hung from wire. To keep it from swaying when door opens and closes we also put 1 1/2" piece of sticky-back velcro on the back of the board and pressed in place against the door to hold.

Tuesday, March 20, 2007

March Pampering

Indoor Gardeners
This time of year gardeners begin to map out their plans, start seeds and look longingly out the window at the ground waiting to be tilled. Encourage those green-thumbed ladies with this houseplant care kit centerpiece and flyswatter gift combo. This theme required very little manual labor to give our hardworking team a much needed break.


Houseplant Care Kit
one wire basket
pair of gardening gloves
garden trowel
plastic spray bottle
gardeners hand creme/lotion or wash
plant food spikes
packet of peet pots
small green plant
tissue paper

Tuck two sheets of tissue paper in bottom of basket. Arrange items in basket, beginning with larger items in center such as spray bottle and flower pot. Tuck taller items behind these such as plant spikes, trowel and gloves. Place in center of table.


Fly Swatter Gift

Our speaker's topic this month happened to be anger. Suddenly the fly swatter gift became a more comical addition to our tables (an anger management tool?). We found these cute ones at IKEA and really if they were just ordinary fly swatters they might not have worked as well. We used a cute flower-tipped clothes pin to attach a verse card to the top of each flyswatter. Then all we had to do was put one at each place at the table.

For more ideas like these and other information on creating inexpensive gifts and decorations, check out the new book, Pampering Gifts: Crafting a Ministry of Treating People Well For Less.

Wednesday, March 07, 2007

Homemade Chalk Boards


I've been wanting to share this new project for a while. I created several small kitchen chalkboards, for myself and for birthday gifts. They were very easy and lots of fun to make. And if you make your own chalkboard paint they're also quite inexpensive.

To create them I took a 2'x4' sheet of hardboard and cut it into 5 1/2"x 7 1/2" pieces on a table saw (actually A Musing Dad cut them down. I mostly watched). Then A Musing Dad helped me round the corners using his router and I beveled the edges slightly using a sander. You don't have to do the rounded corners and if you don't have a saw I believe hardware stores offer a cutting service where you give them the measurement and they cut it for you (don't know if there is a fee involved). So fear not if you don't have big power tools. You can still do this project.

Next you'll need to mix up your paint. You can find formulas on the internet under chalkboard paint, but the basic idea is you mix up colored acrylic paint (not latex), with powdered tile grout and a glazing medium (used for creating faux finishes). I only worked on small areas so I didn't mix much at a time. It works well to mix it up in an old margarine container because then you can seal the container between coats. This way the paint lasts up to two days.

Now paint your surface. I only painted the front of the board with chalkboard paint because the surface of the back is just too rough. I found a painting sponge to work better than a brush. The brush leaves too many marks. Let it dry for at least a half hour. Then sand with a fine grit sand paper to remove any extra bits of grout and recoat. When you're finished, rub across the surface with a piece of chalk to "prime" it.

I bought small plate stands at a craft store to stand them on. As you can see from the photo you can also paint terracotta pots for labeling windowsill herbs (or just for using as a small container or pen holder).

For more ideas like these and other information on creating inexpensive gifts and decorations, check out the new book, Pampering Gifts: Crafting a Ministry of Treating People Well For Less.

Friday, February 16, 2007

February Pampering


Whew! I was glad to see this month's pampering stuff finally get done. I've had clipboards in various stages on my dining room table for at least a month now. Plus 5 of us made 500 notecards. And then there's the 110 beaded pens, and 12 altered clipboards. That was a lot of work! I wouldn't recommend doing so much work, but it certainly turned out looking good. Here are instructions for our "Retro-Chic Office" theme.


Retro-Chic Desk Set
one altered clipboard (see instructions on Nov. 8th post)
one faux leather "in-box"
one plastic magnetic clip holder
one beaded pen (see instructions below)
set of four notecards (see instructions below)

Organize all of the desk items in the center of the table. We stacked the clipboard on the in-box and then placed the clip holder next to the clipboard and the pen and notecards on top of the clipboard (see photo above).


Retro-Chic Correspondence Set
micro "seed" beads
red-liner tape (we used ProvoCraft's Terrifically Tacky Tape)
stick pen
glitter
embossing tool
patterned paper
die-cuts
note cards and envelopes
glue

To create the beaded pen: wrap the red tape around the end of the pen (or you can continue wrapping down the length of the pen to bead it entirely). Remove the outer wrap on the tape and heat both the tape and beads with the embossing tool (take care that you don't melt the pen). Roll taped end of pen in beads, pressing beads in place and manually adding more beads to empty spaces. Dip beaded end of pen into glitter (we used red and black beads and then dipped in red glitter). Tap off excess. Allow to set up overnight before transporting.

To create note cards: Cut squares of paper to fit front of note card (1/4" smaller than note card front). Glue paper onto fronts of some cards. Punch out die cuts and glue to fronts of other cards - we used large retro fabric flower die cuts on some cards and pairs of retro fabric button die cuts on others. We also used flower punches of the patterned paper with brads in the center and on some cards we glued tiny real buttons with the die cut buttons. Be creative (and efficient if you're making 500). We tied sets of four note cards together with ribbon and tucked the pens under the ribbon on top of the note cards.

For more ideas like these and other information on creating inexpensive gifts and decorations, check out the new book, Pampering Gifts: Crafting a Ministry of Treating People Well For Less.

Saturday, February 03, 2007

18" Doll Shoe Organizer


Here are the instructions for the fabric shoe organizer that I promised:
Supplies
5/8 yard cotton fabric (can use canvas too but is stiffer to work with) 1/8 yard medium to heavyweight fusible interfacing thread two large (1/4") eyelets/grommets

1. Cut fabric for back panel 9 1/4" wide by 25 1/2" long (these dimensions are for hanging inside the door of a doll closet).
2. Cut 4 strips for pockets 5" high by 15 3/4" wide.
3. Cut 2 pieces of interfacing 1 3/4" x 9". Fuse to top and bottom of back panel according to manufacturer's instructions.
4. Sew 1/4" hem along sides of back panel. Then hem top and bottom of panels by folding over 2" and stitching 1/4" from unfinished edge. (Hemming the back panel in this order leaves you open pockets along the top & bottom for putting a rod through. If you wish to eliminate this pocket, hem top first, then sides).
5. Hem each pocket top with 1/2" doubled hem (turn under 1/2", press. Then turn under again and stitch).
6. Hem bottom of each pocket 1/4".
7. Iron creases into pockets as follows (creating a "Z" effect):
1 1/2" from outside edges on both sides - press to front
2 1/4" from outside edges on both sides - press under (to back)
6 1/4" from outside edges on both sides - press under
7" from outside edges on both sides - press to front
8. Pin pockets to front at following spots, matching centers and folding ends over outside edge of back panels to back:
Pocket 1: 1 3/4" from top
Pocket 2: 6 3/8" from top
Pocket 3: 10 3/4" from top
Pocket 4: 15 1/4" from top
9. Stitch outside edges of all pockets to back panel 1/4" from edge of back panel (leaving z-folds of pockets free). and again 1/8" away.You can see here that the pockets are stitched on the sides but not yet on the bottoms:
10. Stitch down center between pockets
11. Stitch across bottom of each pocket 1/4" from edge, making certain pockets are folded down.
12. Apply eyelets having centers of each 7 1/4" apart and 7/8" from top of panel. Follow manufacturer's instructions for applying (this is based on placement of hooks at 7 1/4" apart. You may need to refigure placement of eyelets based on your own hook placement.
Here you can see the finished organizer hanging from the eyelets.


You can also make a French Memo board to go on the door.

Monday, January 22, 2007

January 2007 GEMS Pampering

Here are the projects we did for our January couple's gathering.

White wood trays with acrylic inserts accented by football field liners and topped with a football-shaped bowl, easy snack nut recipe, plastic cups and a bag of pigskin chocolates kicked off the theme at the center of the table. Each couple was also presented with their own set of elegant tumbled marble coasters.


Centerpiece -- Game Night Tray

15 x 11” white wood tray with handles and acrylic insert

12” x 12” football field scrapbook paper

football bowl

set of plastic sports themed cups

green cardstock

sweet/salty nut recipe (see appendix)

football shaped chocolates

bags of snacks such as Cheetos

Cut one inch off end of scrapbook paper and place in tray under acrylic. Wrap chocolates in plastic bag and tie with green raffia. Arrange bowl, cups, snack bags, and chocolates on tray. Create snack nut recipe card by printing recipe from Appendix and attaching to 4” x 6” piece of green card stock. Prop recipe card on tray among other items.


Pampering Gift -- Tumbled Marble Coasters

4 - 4” x 4” tumbled marble tiles

stamps (we used

Stazon permanent ink pad

3/8” adhesive felt dots

matte acrylic sealer

To prepare tiles for stamping clean all surfaces with a damp cloth and allow to dry. Stamp images on tile and set by blow drying with either a heat embosser or hair dryer. Apply one felt dot to each corner on bottom of tile. After images are dry, spray a light coat of acrylic to seal. Tie coasters into a bundle with ribbon or twine.


For more ideas like these and other information on creating inexpensive gifts and decorations, check out the new book, Pampering Gifts: Crafting a Ministry of Treating People Well For Less.

Wednesday, January 03, 2007

Rollabind Notepads

I got a fun new tool for Christmas. It's a Rollabind punch set - it punches paper for binding with plastic circles. So I can make my own books (no, this is not a start on self-publishing my book). Anyway, I had some fun with it on Christmas Day. Here's what I made:

It's a notepad. I created a "To Do" list template on the computer that I printed out and then cut to 8 1/2" x 3 1/2". I used heavy card stock for the front and back covers and mounted this Christmasy paper on top. The stamp is from TAC's "Tag Tidbits". Then I punched the top of the pages with the Rollabind and bound them with small discs. I realize without a Rollabind you're not going to just jump up and make one of these. But if you're looking for a fun tool for paper crafting, I'd strongly recommend this one. It's great for all sorts of different gift-giving projects, both big and small. Who knows, our GEMS group may end up with notepads or something made with it in the next year or two. Here's a link to some ideas of other things you can make with a Rollabind.


For more ideas like this and other information on creating inexpensive gifts and decorations, check out the new book, Pampering Gifts: Crafting a Ministry of Treating People Well For Less.

Friday, December 22, 2006

Holiday Entertaining Tip #2

Here's a tip for those who are hosting overnight guests or even just dinner. Pamper your guests by sprucing your linens up with Lavender Linen Spray (lavender has calming properties and a pleasant scent). If you don't have time to put a batch together now, do it in the lull after the holidays. Then use it on your own pillowcase and sheets for restful sleep (which some of us will be really glad for next week).

Lavender Linen Spray
1/2 c. distilled water
1 tsp. vodka or witch hazel
5-6 drops of lavender essential oil (Whole Foods or Wild Oats)
1 - 4 oz. spray bottle (Walgreen's sells them in the beauty aisle)

Mix and pour into clean spray bottle.

To use:spray on sheets and table linens before using or while pressing with hot iron.

For more ideas like this and other information on creating inexpensive gifts and decorations, check out the new book, Pampering Gifts: Crafting a Ministry of Treating People Well For Less.

Monday, December 18, 2006

Holiday Felt Bags


These are two little felt bags I made to put gifts in for a couple young girls on our gift list. I'd been seeing these kinds of things in lots of stores and kept thinking, 'I bet I could make those myself'. So yesterday I planned out the pattern and today I sewed them. They're quite simple to make and if you're a sewer like me, you've probably got the supplies just lying around waiting to be used. Here's how it's done:

Holiday Felt Bag
2 - 6 1/2" x 7" brown felt squares
1 - 2 3/4" x 20" brown felt strip
2 - 1" x 10" brown felt strips
1 - 3" white circle
1 - 3" red circle
2 white triangles

Start by cutting out all the above pieces. Next cut a pinwheel shape from the red circle. Glue red "pinwheel" onto white circle. Gather points of triangles by stitching about a half inch up from the tip and pulling taught. Stitch inside edges of red pinwheel. Pin circle and triangles to front of one square. Next stitch around perimeter of circle, making sure that triangles are caught in stitching. Pin 20" strip to sides and bottom of one square. Stitch 1/4" from edge along entire strip, making sure to stop and turn 1/4" from end of each section. Repeat with other square. Fold 10" strips in half lengthwise. Stitch 1/4" from unfinished edge on each strip. Pin strips to top of bag about 1" in from each side. Stitch around entire top of bag, catching each handle strip in stitching. Bag is complete! Fill with toiletries or other fun gift!

You could make these in almost any color and put whatever design on them that you want. I'd thought about doing gingerbread men. The peppermint candy was just easier. Have fun creating your own designs for any season or occasion!

For more ideas like this and other information on creating inexpensive gifts and decorations, check out the new book, Pampering Gifts: Crafting a Ministry of Treating People Well For Less.

Saturday, December 16, 2006

Another Holiday Gift Idea: Homemade Spa Gifts

Still in need of a last-minute gift idea? There's still time to make a few simple gifts. And homemade spa gifts can be easy and much less expensive than their commercial counterparts, without losing anything in the translation. Here's one that my sister especially enjoys (I'm not telling if she's getting it this year or not).

Raw Sugar Scrub
1 c. raw or granulated sugar
1/4 c. walnut or other light oil, such as almond
1/2 tsp. vitamin E oil
essential oils - I use sweet orange, lime & grapefruit

Mix all together and package in jar. Hinged-lid jars look particularly classy, like Origins. (You may want to note the following on your gift tag: "caution when using: contents can cause surfaces such as shower floor to become slippery").

Here's a few hints on supplies: I used milled cane sugar and almond oil. You can find these at natural food stores like Wild Oats or Whole Foods Market. For vitamin E oil I just buy capsules from the drugstore, poke them with a pin and squeeze the oil out (labor intensive, but worth it). Essential oils can be found at the natural food stores, but even Meijer has started carrying Aura Cacia brand, just not very interesting scents. The essential oils will be the priciest item on the list, but you only need 1-2 drops of each for the whole batch.

Have fun making it. And when you're done mixing and pouring into the jars be sure to wipe your mixing bowls out completely using your hands. Don't waste one bit of this wonderful stuff. You can even rub a little onto your elbows. See how nice it feels? You may decide to keep it instead of giving it away!

For more ideas like this and other information on creating inexpensive gifts and decorations, check out the new book, Pampering Gifts: Crafting a Ministry of Treating People Well For Less.

Friday, December 01, 2006

Holiday Entertaining Tip #1

Okay, I'm not an expert at "entertaining". I know people who really dress things up well - candles burning all around, fresh flowers on the table, that sort of stuff. I wish I could be like that. And I try, in my own way. Which means I'm always on the lookout for cool things to spice up my decor and food spreads. I'm also budget-conscious. So if I can find some chichi idea that I can do myself for less, I jump on it. One of my favorites for the holidays is chocolate-covered spoons. They seem like a luxury, but they're so easy to make and inexpensive too. If you're hosting a holiday party, try making these to set out by your coffee (or make a set of them and package up with hot chocolate or coffee as a gift). Here's a recipe I clipped out of the Chicago Tribune a few years back (if you do a Google search for "chocolate spoons" you'll find a ton of recipes, most very similar). I've used this one. It works great.

Chocolate-covered Spoons
Melt 12 oz. of chocolate chips in a 2-cup microwave-safe bowl on medium (50% power) for 2 minutes. Stir. Repeat for 1-minute intervals until melted.
Dip a plastic spoon in the melted chocolate to cover the spoon bowl; tap handle against bowl to smooth and remove excess chocolate.
Place spoon on a wax-paper-lined jellyroll pan (I put mine on a cookie sheet). Repeat, making 24 chocolate spoons; refrigerate 10 minutes to set.
Melt white chocolate chips, following the directions given above. Drizzle white chocolate over the chocolate spoons to decorate. (I've seen them also decorated with colored sugar).
If you want to give these as gifts simply wrap each one in plastic wrap or cellophane and tie with a ribbon.

Happy entertaining!

Note: The above instructions from the Tribune suggest this will only make 24 spoons. They must have been very generous with the amount of chocolate on each spoon. I tapped the excess off and still had enough for nearly 3 dozen spoons and 2 dozen pretzel rods (I was tired of doing spoons. For pretzel rods, just dunk 2/3 of the rod into the chocolate, let set for a few minutes in the fridge, then roll in sprinkles and return to fridge until completely set).

For more ideas like this and other information on creating inexpensive gifts and decorations, check out the new book, Pampering Gifts: Crafting a Ministry of Treating People Well For Less.

Friday, November 17, 2006

November Centerpiece & Take-Home Gift Ideas

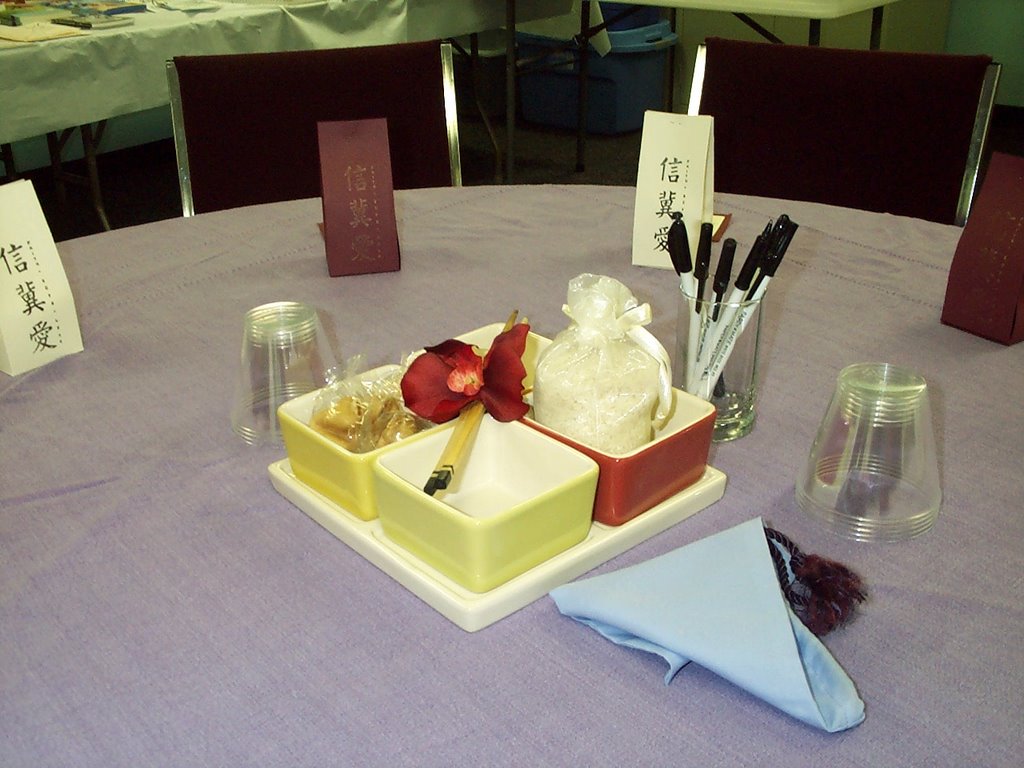
Here are photos from our GEMS gathering room today.


Do you like our oriental theme? The centerpieces are a set of four square dip dishes on a square platter (from IKEA) containing a rice-filled organza bag, fortune cookies and a pair of chopsticks tied with ribbon & a silk flower. Then each lady took home a treat box filled with two fortune cookies that we had specially printed for us. These are the 2-4-6-8 boxes (actually they’re 2 5/8, 5 ¼, 7 7/8 and 10 ½ boxes, but 2-4-6-8 is so much easier to say) I mentioned previously.


How to make these boxes: because we wanted taller bags, we had to use a full 8 ½ x 11 sheet of cardstock. Normally 2-4-6-8 boxes are made with a half sheet of 8 ½ x 11 (ie. 8 ½ x 5 ½), which you cut and score at 2", 4" , 6" & 8" - hence the name. You can easily find directions for those boxes on various paper crafting websites (Splitcoast Stampers is one of my favorites). The instructions here are modified for full-sheet size (and I’ve added a few hints from my experience).


Modified 2-4-6-8 boxes

1 sheet 8 ½ x 11” cardstock

stamp or other decoration (ours was a Stampendous stamp that had the words Faith, Hope and Love vertically oriented in both Chinese characters and in English – Hobby Lobby once carried this stamp, don’t know if they still do)

ink

strong adhesive – Tombow scrapbook adhesive works well

two custom fortune cookies (check out www.fortunecookiestore.com)


Start by scoring your cardstock 2 5/8” from one side, from top to bottom (see illustration below).


Next, turn the cardstock lengthwise with the score line closer to the bottom. Score down to your previous score line at 2 5/8”, 5 ¼”, 7 7/8” and 10 ½”. Then, without turning the paper, cut up from the bottom to the first score line at each of those same measurements according to the drawing. (It’s easiest if you have a blade cutter where you can run a cutting blade and a scoring blade from either end at the same time. If not, you can do all your scoring lines first, then go back and cut.) You will end up with a small ½” x 2 5/8” rectangle cut-out in one corner - just pitch it.


Here’s what it should look like (dotted lines are “score” & solid are “cut”):


Now stamp and decorate your box. You may want to lightly fold it to line up your images. We stamped our boxes on both the front and the back (remember, the side portions will fold in like on a milk carton, so you don’t want to stamp on them).

You’re ready to assemble the box. Start by folding the score lines. I recommend using a bone folder or ruler to make your folds sharper. Put adhesive on three of your four base flaps (remember which one will be the bottom as you assemble) and on the ½” flap. Put the box together, being careful to line each portion up . You’ll want to take extra care in adhering the bottom part of the ½” flap as that part tends to buckle and unglue.


Put your fortune cookies into the box. Pull the front and back together at the top, tucking the sides in like a milk carton. Then to close you can either staple the top, like we did, or you can punch holes at the top and put ribbon through to tie closed.


Here's a finished box:


Other options: cut a hole in the front section for a window. Then either cover with acetate to keep the treats in, or put the treats in a clear bag before putting into the box. You could obviously use any theme or color scheme and can change what you put into the box to match. I’ve seen Valentine boxes with Hershey kisses and Halloween ones with candy corns. Be creative! And have fun!


Oh, and since we’re price-sensitive with our “pampering”, let me give you a rough cost. Cardstock will cost you 35 cents or less per sheet. Fortune cookies run 40 cents or less apiece (depending on quantity). Plus you’ll need to add the cost of a stamp, ink and adhesive, maybe staples. At most you’ll be spending $1.50 apiece. Ours, because we were making 100 and used some coupons at the craft stores, cost less than a dollar. Change what you put in your boxes and you could probably spend even less than that.


For more ideas like this and other information on creating inexpensive gifts and decorations, check out the new book, Pampering Gifts: Crafting a Ministry of Treating People Well For Less.

Wednesday, November 08, 2006

A Holiday Gift Idea

A lot of people are complaining lately about "holiday creep" - the fact that retailers keep putting up their Christmas displays earlier and earlier every year. And I admit, I was a bit thrown the other day when the toy store I was shopping at had Christmas music playing. Even my seven-year-old commented on it along the lines of "what's up with that?". But in reality for those of us who are crafters, thoughts of the holidays start long before October 31st. We have to in order to get all the handmade gifts done in time.


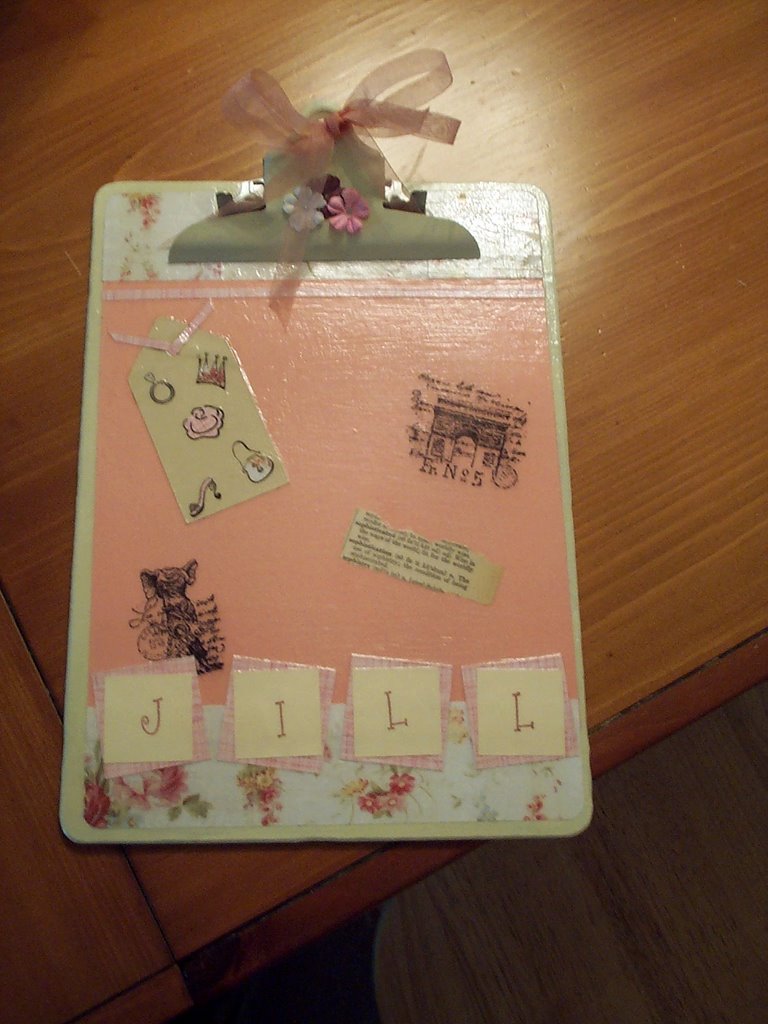
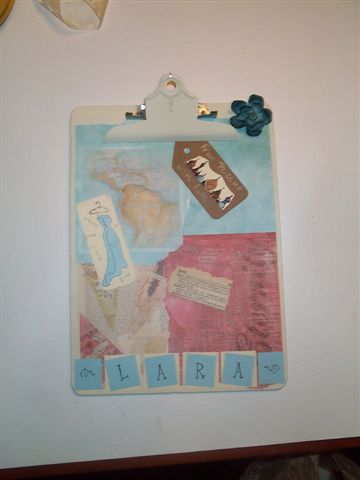
I hit upon an idea back in August when I found a boxful of masonite clipboards for cheap at a garage sale. Altered clipboards for everyone! These photos show two clipboards I've already made. Wanna know how it's done? See the instructions at the end of this post.

My question for you today is: "what are you giving to the special service provider-type people in your children's lives this year?". I'm talking teachers (school, church, piano, etc.), babysitters and other special folks who deserve a gift of appreciation. Share your ideas (and in the weeks to come I'll try to share more of mine).

Altered Clipboard Instructions:
Supplies - wood clipboard
patterned paper
stamps, stickers or other embellishments
scrapbooking/paper crafting adhesive
small clamp
acrylic craft paints
Mod Podge
clear acrylic spray (optional)
Begin by selecting your paper and color scheme. You can paint the back and outer edges to complement your scheme. I usually paint the clip also after the rest is done (the clip should be clamped open when painting the wood surface and gluing on your papers). Next decide how your going to arrange the paper and any other elements (such as tags or words, etc). Stamp (and color, if necessary) any images or words you will be using. Then begin gluing the pieces onto the clipboard (be sure if any elements are overlapping that you glue them in the correct order). I usually run the base layer through my Xyron machine as I find that adhesive to be the strongest. Once you are done painting and gluing you'll want to seal all the pieces by coating them with Mod Podge. I usually use a satin finish rather than glossy. It is recommended that you wet sand between coats, but I find that this sometimes mars the images and the paper. 2-3 coats of Mod Podge should be sufficient. Once you've completed the clipboard you can give a final coat of protection (a necessary step if you expect the recipient to be using the clipboard) by spraying it with a clear acrylic. For the women on my gift list I like to add an organza ribbon to the clip for an added touch.

There you go! Have fun altering a clipboard. If you make one, tell me about it.

For more ideas like this and other information on creating inexpensive gifts and decorations, check out the new book, Pampering Gifts: Crafting a Ministry of Treating People Well For Less.